资源
正文
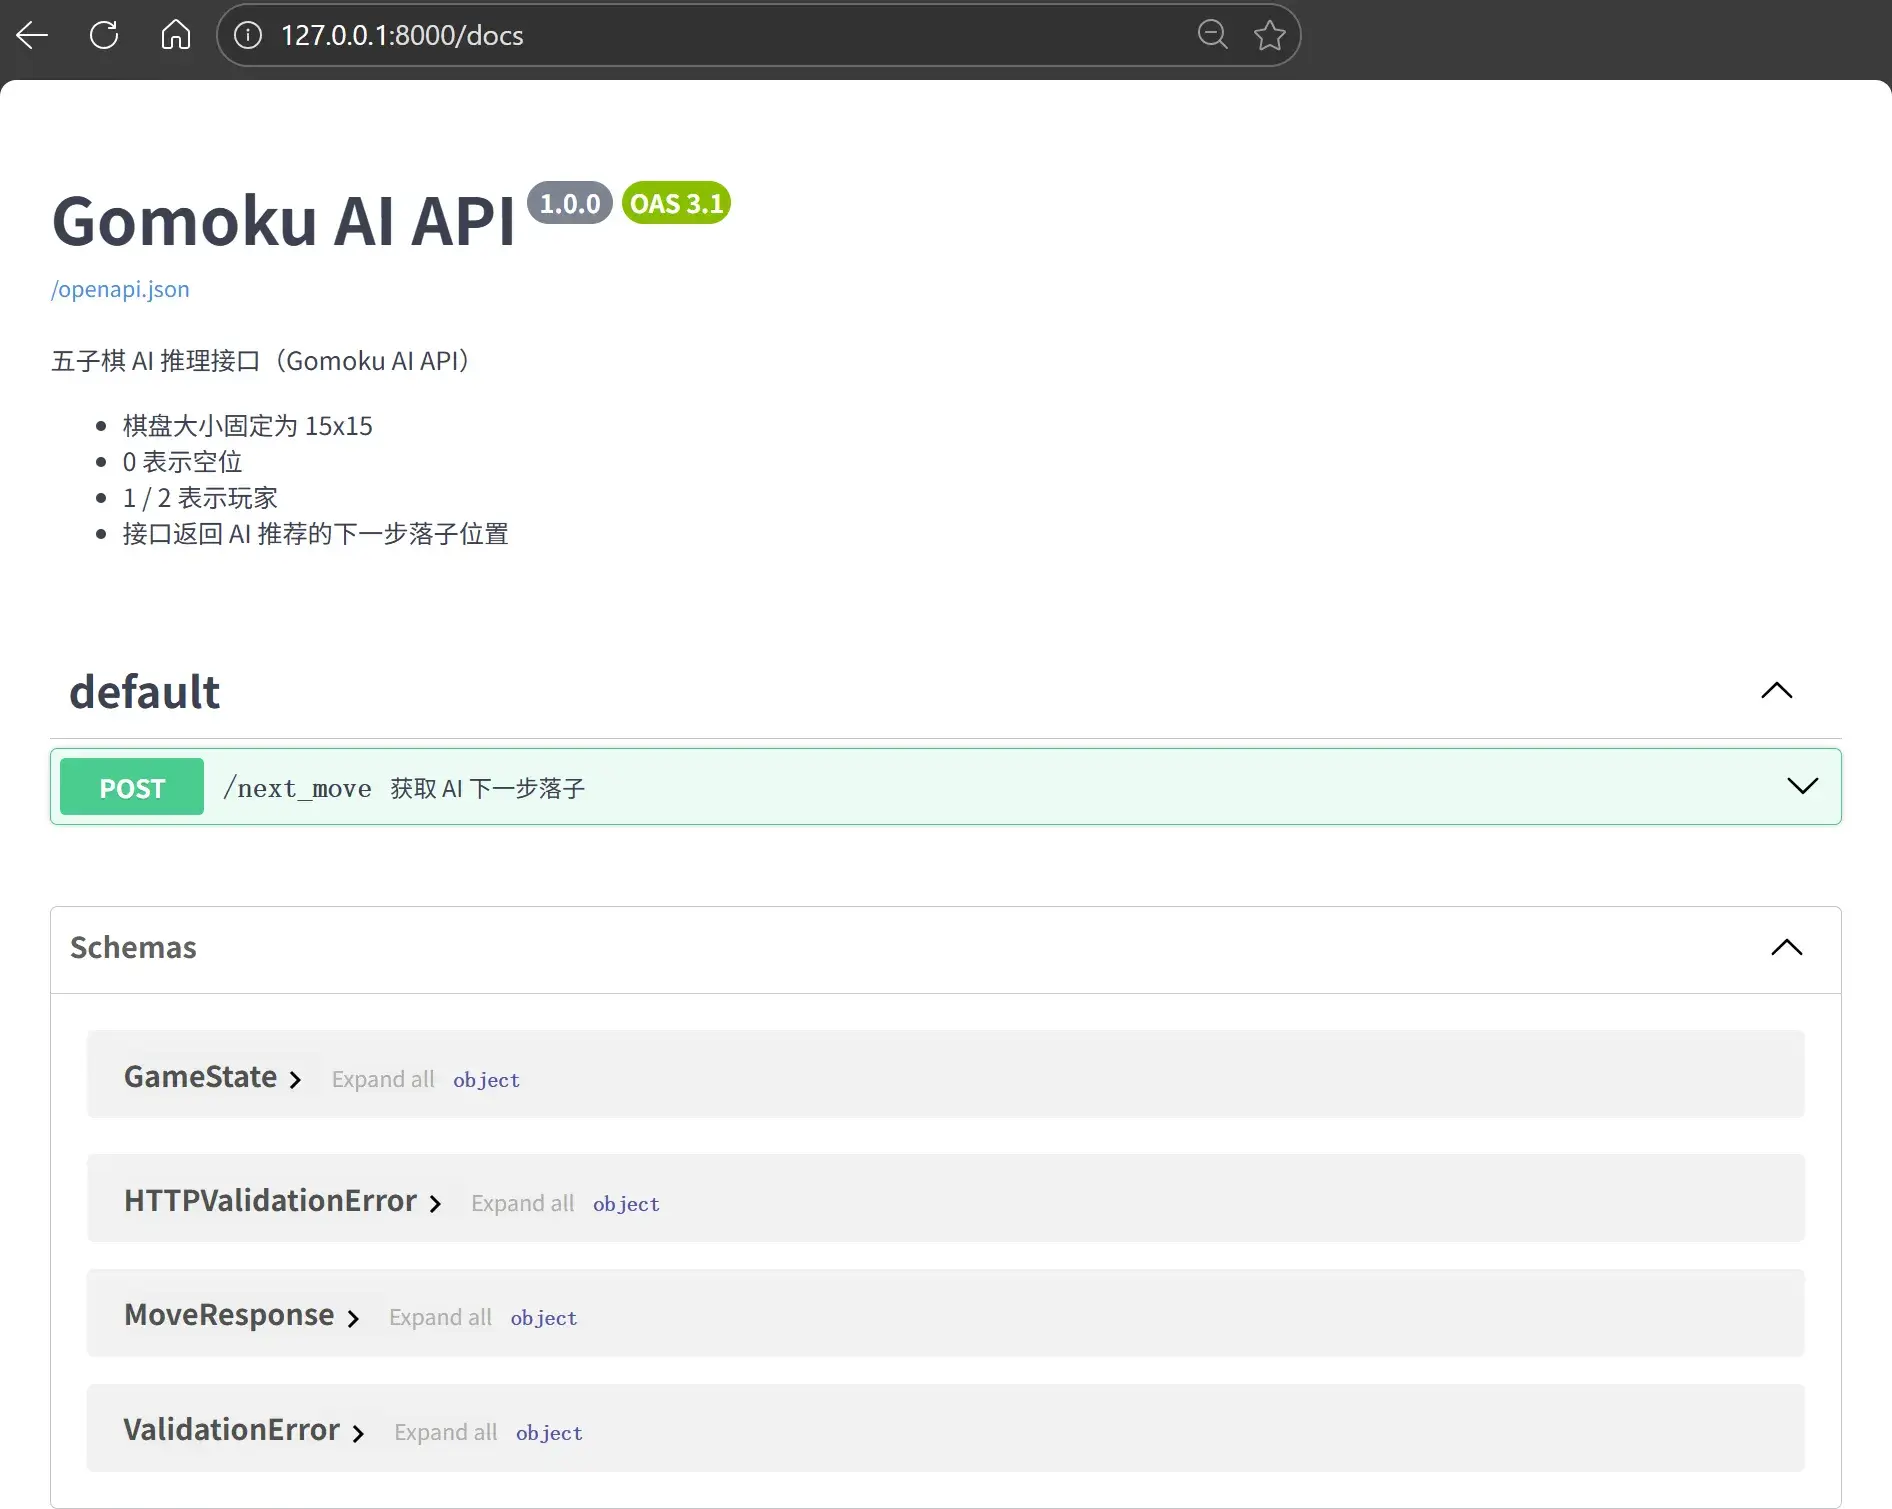
基于 ChatGPT 的 FAST 后端
提示
用 FastAPI 写一个五子棋对战的后端,能够接受当前棋局状况并返回下一步的走法。
创建一个项目 gomoku 里面放上 main.py:
from fastapi import FastAPI, HTTPException
from pydantic import BaseModel, Field
from typing import List, Tuple
from fastapi.middleware.cors import CORSMiddleware
import math

BOARD_SIZE = 15

app = FastAPI(
    title="Gomoku AI API",
    description="""
五子棋 AI 推理接口(Gomoku AI API)

- 棋盘大小固定为 15x15
- 0 表示空位
- 1 / 2 表示玩家
- 接口返回 AI 推荐的下一步落子位置
""",
    version="1.0.0",
)

app.add_middleware(
    CORSMiddleware,
    allow_origins=["*"],  # 开发环境下允许所有来源
    allow_methods=["*"],
    allow_headers=["*"],
)

# ---------- 数据模型 ----------

class GameState(BaseModel):
    board: List[List[int]] = Field(
        description="15x15 棋盘,0=空,1=玩家1,2=玩家2"
    )
    ai_player: int = Field(
        description="AI 执子方(1 或 2)",
        example=1
    )

    model_config = {
        "json_schema_extra": {
            "example": {
                "board": [[0] * 15 for _ in range(15)],
                "ai_player": 1
            }
        }
    }


class MoveResponse(BaseModel):
    row: int = Field(description="落子行坐标(0-based)", example=7)
    col: int = Field(description="落子列坐标(0-based)", example=7)

    model_config = {
        "json_schema_extra": {
            "example": {
                "row": 7,
                "col": 7
            }
        }
    }

# ---------- 工具函数 ----------

def is_valid_board(board: List[List[int]]) -> bool:
    if len(board) != BOARD_SIZE:
        return False
    return all(len(row) == BOARD_SIZE for row in board)


def get_opponent(player: int) -> int:
    return 1 if player == 2 else 2


def count_in_direction(
    board: List[List[int]],
    row: int,
    col: int,
    dr: int,
    dc: int,
    player: int
) -> int:
    count = 0
    r, c = row + dr, col + dc
    while 0 <= r < BOARD_SIZE and 0 <= c < BOARD_SIZE and board[r][c] == player:
        count += 1
        r += dr
        c += dc
    return count


def score_position(board: List[List[int]], row: int, col: int, player: int) -> int:
    directions = [
        (1, 0),   # vertical
        (0, 1),   # horizontal
        (1, 1),   # diagonal
        (1, -1),  # anti-diagonal
    ]

    score = 0
    for dr, dc in directions:
        count = (
            count_in_direction(board, row, col, dr, dc, player) +
            count_in_direction(board, row, col, -dr, -dc, player)
        )
        if count >= 4:
            score += 10000   # 五连
        elif count == 3:
            score += 1000
        elif count == 2:
            score += 100
        elif count == 1:
            score += 10
    return score


def find_best_move(board: List[List[int]], ai_player: int) -> Tuple[int, int]:
    opponent = get_opponent(ai_player)
    best_score = -math.inf
    best_move = None

    for r in range(BOARD_SIZE):
        for c in range(BOARD_SIZE):
            if board[r][c] != 0:
                continue

            attack = score_position(board, r, c, ai_player)
            defense = score_position(board, r, c, opponent)

            total_score = attack + defense * 0.9

            if total_score > best_score:
                best_score = total_score
                best_move = (r, c)

    if best_move is None:
        raise RuntimeError("No valid moves")

    return best_move

# ---------- API ----------

@app.post(
    "/next_move",
    response_model=MoveResponse,
    summary="获取 AI 下一步落子",
    description="""
根据当前棋盘状态计算 AI 的最佳落子位置。

规则说明:
- 棋盘大小固定为 15x15
- 0 表示空位
- 1 / 2 表示不同玩家
- 返回值为 0-based 行列坐标
""",
)
def next_move(state: GameState):
    if state.ai_player not in (1, 2):
        raise HTTPException(status_code=400, detail="ai_player must be 1 or 2")

    if not is_valid_board(state.board):
        raise HTTPException(status_code=400, detail="Invalid board size")

    row, col = find_best_move(state.board, state.ai_player)
    return MoveResponse(row=row, col=col)
用 uv 管理这个项目:
python -m uv init
python -m uv add fastapi uvicorn
运行这个服务器:
python -m uv run uvicorn main:app --reloadINFO: Will watch for changes in these directories: ['D:\\XXX']
INFO: Uvicorn running on http://127.0.0.1:8000 (Press CTRL+C to quit)
INFO: Started reloader process [31648] using StatReload
INFO: Started server process [10104]
INFO: Waiting for application startup.
INFO: Application startup complete.
重要
上述这个命令只能通过 http://127.0.0.1:8000 访问服务器,要让服务器监听所有网卡(0.0.0.0)则:
python -m uv run uvicorn main:app --host 0.0.0.0 --port 8000 --reloadINFO: Will watch for changes in these directories: ['D:\\XXX']
INFO: Uvicorn running on http://0.0.0.0:8000 (Press CTRL+C to quit)
INFO: Started reloader process [13184] using StatReload
INFO: Started server process [28536]
INFO: Waiting for application startup.
INFO: Application startup complete
创建一个 gomoku.json,试试看后端能不能用:
{
  "board": [
    [0,0,0,0,0,0,0,0,0,0,0,0,0,0,0],
    [0,0,0,0,0,0,0,0,0,0,0,0,0,0,0],
    [0,0,0,0,0,0,0,0,0,0,0,0,0,0,0],
    [0,0,0,0,0,0,0,0,0,0,0,0,0,0,0],
    [0,0,0,0,0,0,0,0,0,0,0,0,0,0,0],
    [0,0,0,0,0,0,0,0,0,0,0,0,0,0,0],
    [0,0,0,0,0,0,0,0,0,0,0,0,0,0,0],
    [0,0,0,0,0,0,0,1,0,0,0,0,0,0,0],
    [0,0,0,0,0,0,0,0,0,0,0,0,0,0,0],
    [0,0,0,0,0,0,0,0,0,0,0,0,0,0,0],
    [0,0,0,0,0,0,0,0,0,0,0,0,0,0,0],
    [0,0,0,0,0,0,0,0,0,0,0,0,0,0,0],
    [0,0,0,0,0,0,0,0,0,0,0,0,0,0,0],
    [0,0,0,0,0,0,0,0,0,0,0,0,0,0,0],
    [0,0,0,0,0,0,0,0,0,0,0,0,0,0,0]
  ],
  "ai_player": 2
}| 字段 | 类型 | 说明 |
|---|---|---|
board | int\[15][15] | 0 = 空,1 = 玩家 1,2 = 玩家 2 |
ai_player | int | AI 执子(1 或 2) |
使用 curl.exe:
curl.exe -X POST http://127.0.0.1:8000/next_move `
  -H "Content-Type: application/json" `
  --data-binary "@gomoku.json"
得到 AI 给出的下一步走法:
{"row":6,"col":6}| 字段 | 类型 | 说明 |
|---|---|---|
row | int | 行坐标(0-based) |
col | int | 列坐标(0-based) |
基于 Claude 的 Mermaid 流程图
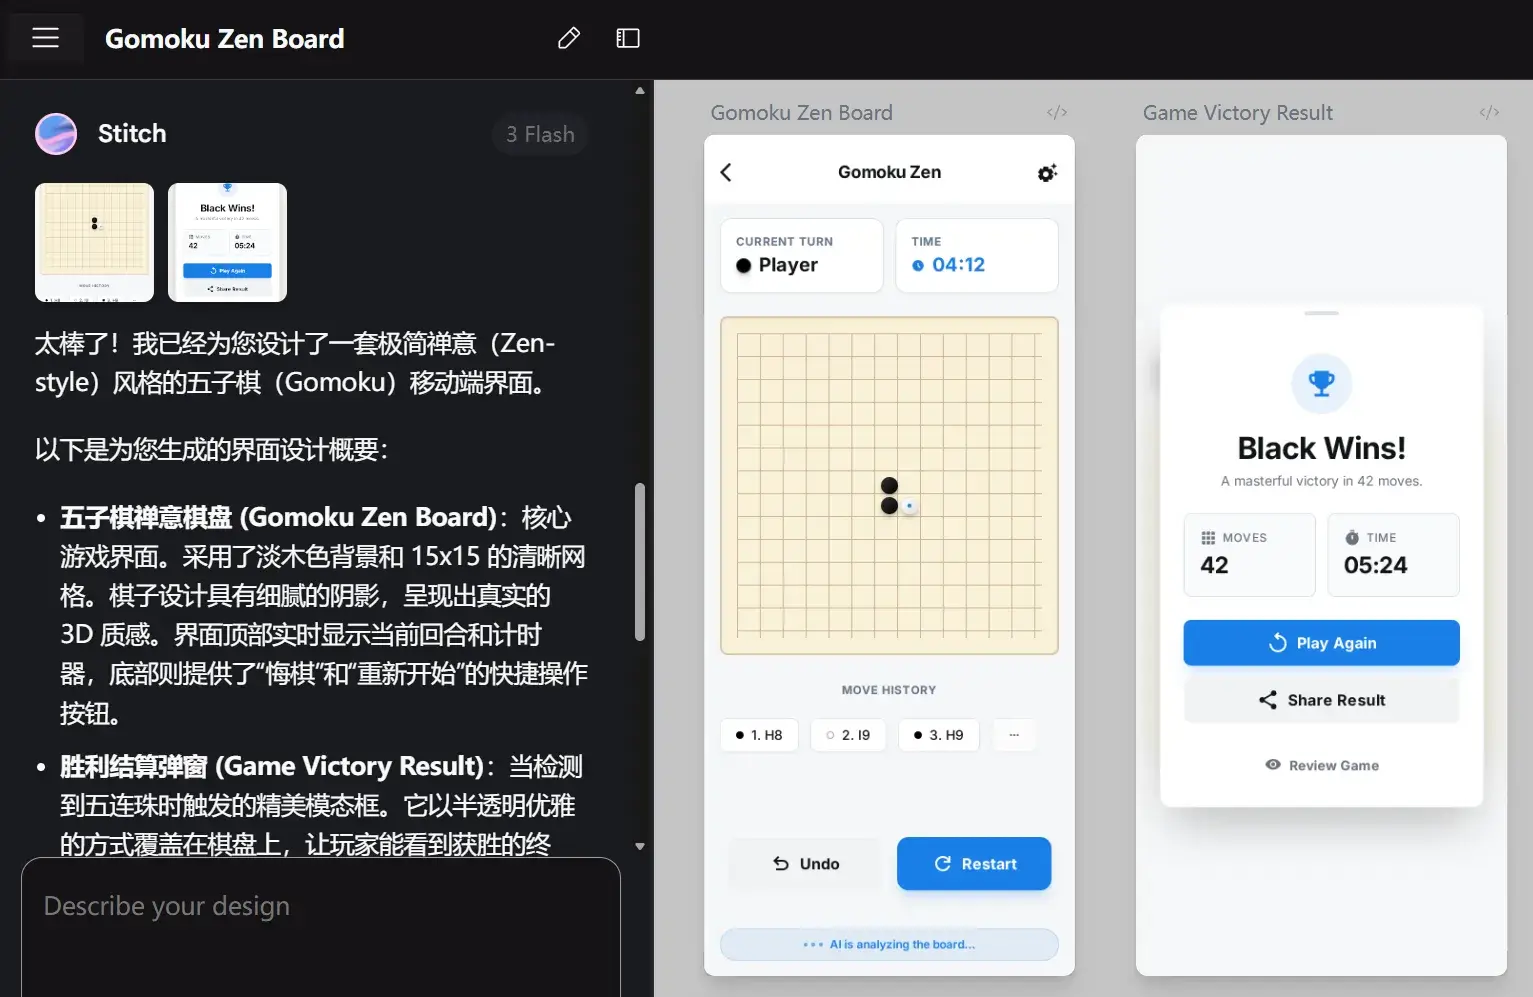
基于 Gemini 的 提示词生成和基于 Stitich 界面设计
提示
如果我想让 Google Stitich 帮我设计一个前端,我该如何写提示词,需求如下:
设计一个五子棋 APP 的客户端界面,要求能够连接 http://127.0.0.1:8000 的后端:(python 后端代码)
提示
我需要你为一个五子棋(Gomoku)项目编写一个 React 前端应用(使用 Tailwind CSS)。
- 基础 UI 要求:
设计一个 15x15 的棋盘,风格要求极简、现代(Zen 风格)。
棋盘格线要清晰,背景使用淡木色。
棋子为黑白圆片,需有细腻的阴影效果(看上去像实体棋子)。
侧边栏显示当前回合(玩家 vs AI)、计时器和落子历史。
- 核心逻辑:
初始化: 棋盘状态为一个 15x15 的二维数组,0 代表空,1 代表玩家(黑子),2 代表 AI(白子)。
交互: 玩家点击交叉点落子,前端需验证该位置是否为空。
API 集成: 玩家落子后,前端需立即向 http://127.0.0.1:8000/next_move 发送 POST 请求。
Request Payload: {"board": number[][], "ai_player": 2}
Response Format: {"row": number, "col": number}
AI 回合: 收到后端返回的坐标后,在棋盘上自动更新 AI 的落子。
- 技术栈建议:
使用 React + Hooks (useState, useEffect)。
使用 Fetch API 处理异步请求。
增加胜负判断逻辑(五连珠即胜利),并弹出精美的模态框提示。
- 附加功能:
包含“悔棋”和“重新开始”按钮。
响应式设计,适配桌面端和移动端浏览器。
在 Stitch 上生成好之后,导出至 AI Studio:

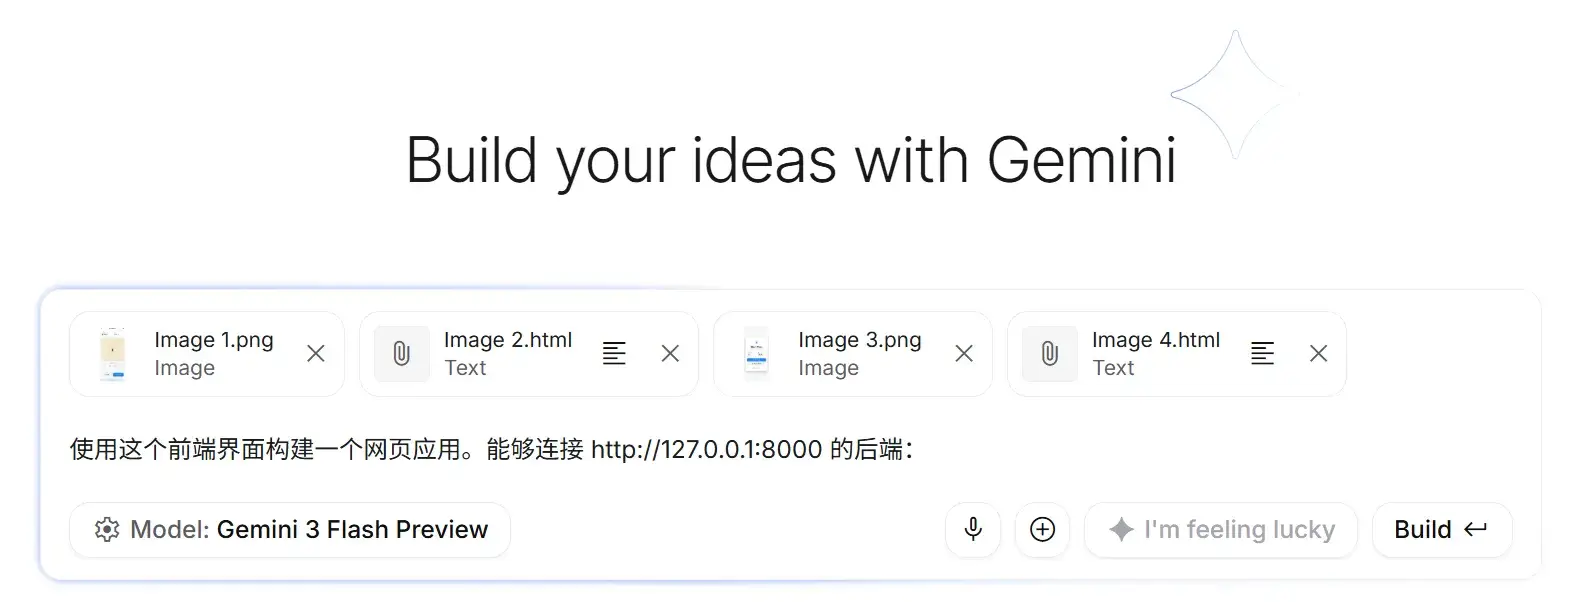
基于 AI Studio 的前端开发
提示
使用这个前端界面构建一个网页应用。能够连接 http://127.0.0.1:8000 的后端。通过
curl.exe -X POST http://127.0.0.1:8000/next_move -H "Content-Type: application/json" --data-binary "gomoku.json"与后端通信
gomoku.json 的示例:
{
  "board": [
    [0,0,0,0,0,0,0,0,0,0,0,0,0,0,0],
    [0,0,0,0,0,0,0,0,0,0,0,0,0,0,0],
    [0,0,0,0,0,0,0,0,0,0,0,0,0,0,0],
    [0,0,0,0,0,0,0,0,0,0,0,0,0,0,0],
    [0,0,0,0,0,0,0,0,0,0,0,0,0,0,0],
    [0,0,0,0,0,0,0,0,0,0,0,0,0,0,0],
    [0,0,0,0,0,0,0,0,0,0,0,0,0,0,0],
    [0,0,0,0,0,0,0,1,0,0,0,0,0,0,0],
    [0,0,0,0,0,0,0,0,0,0,0,0,0,0,0],
    [0,0,0,0,0,0,0,0,0,0,0,0,0,0,0],
    [0,0,0,0,0,0,0,0,0,0,0,0,0,0,0],
    [0,0,0,0,0,0,0,0,0,0,0,0,0,0,0],
    [0,0,0,0,0,0,0,0,0,0,0,0,0,0,0],
    [0,0,0,0,0,0,0,0,0,0,0,0,0,0,0],
    [0,0,0,0,0,0,0,0,0,0,0,0,0,0,0]
  ],
  "ai_player": 2
}
后端代码:
…Build 之:
调教完下载之。
安装必要库:
npm installnpm run dev> gomoku-zen@0.0.0 dev
> vite
VITE v6.4.1 ready in 170 ms
➜ Local: http://localhost:3000/
➜ Network: http://192.168.1.10:3000/
➜ press h + enter to show help
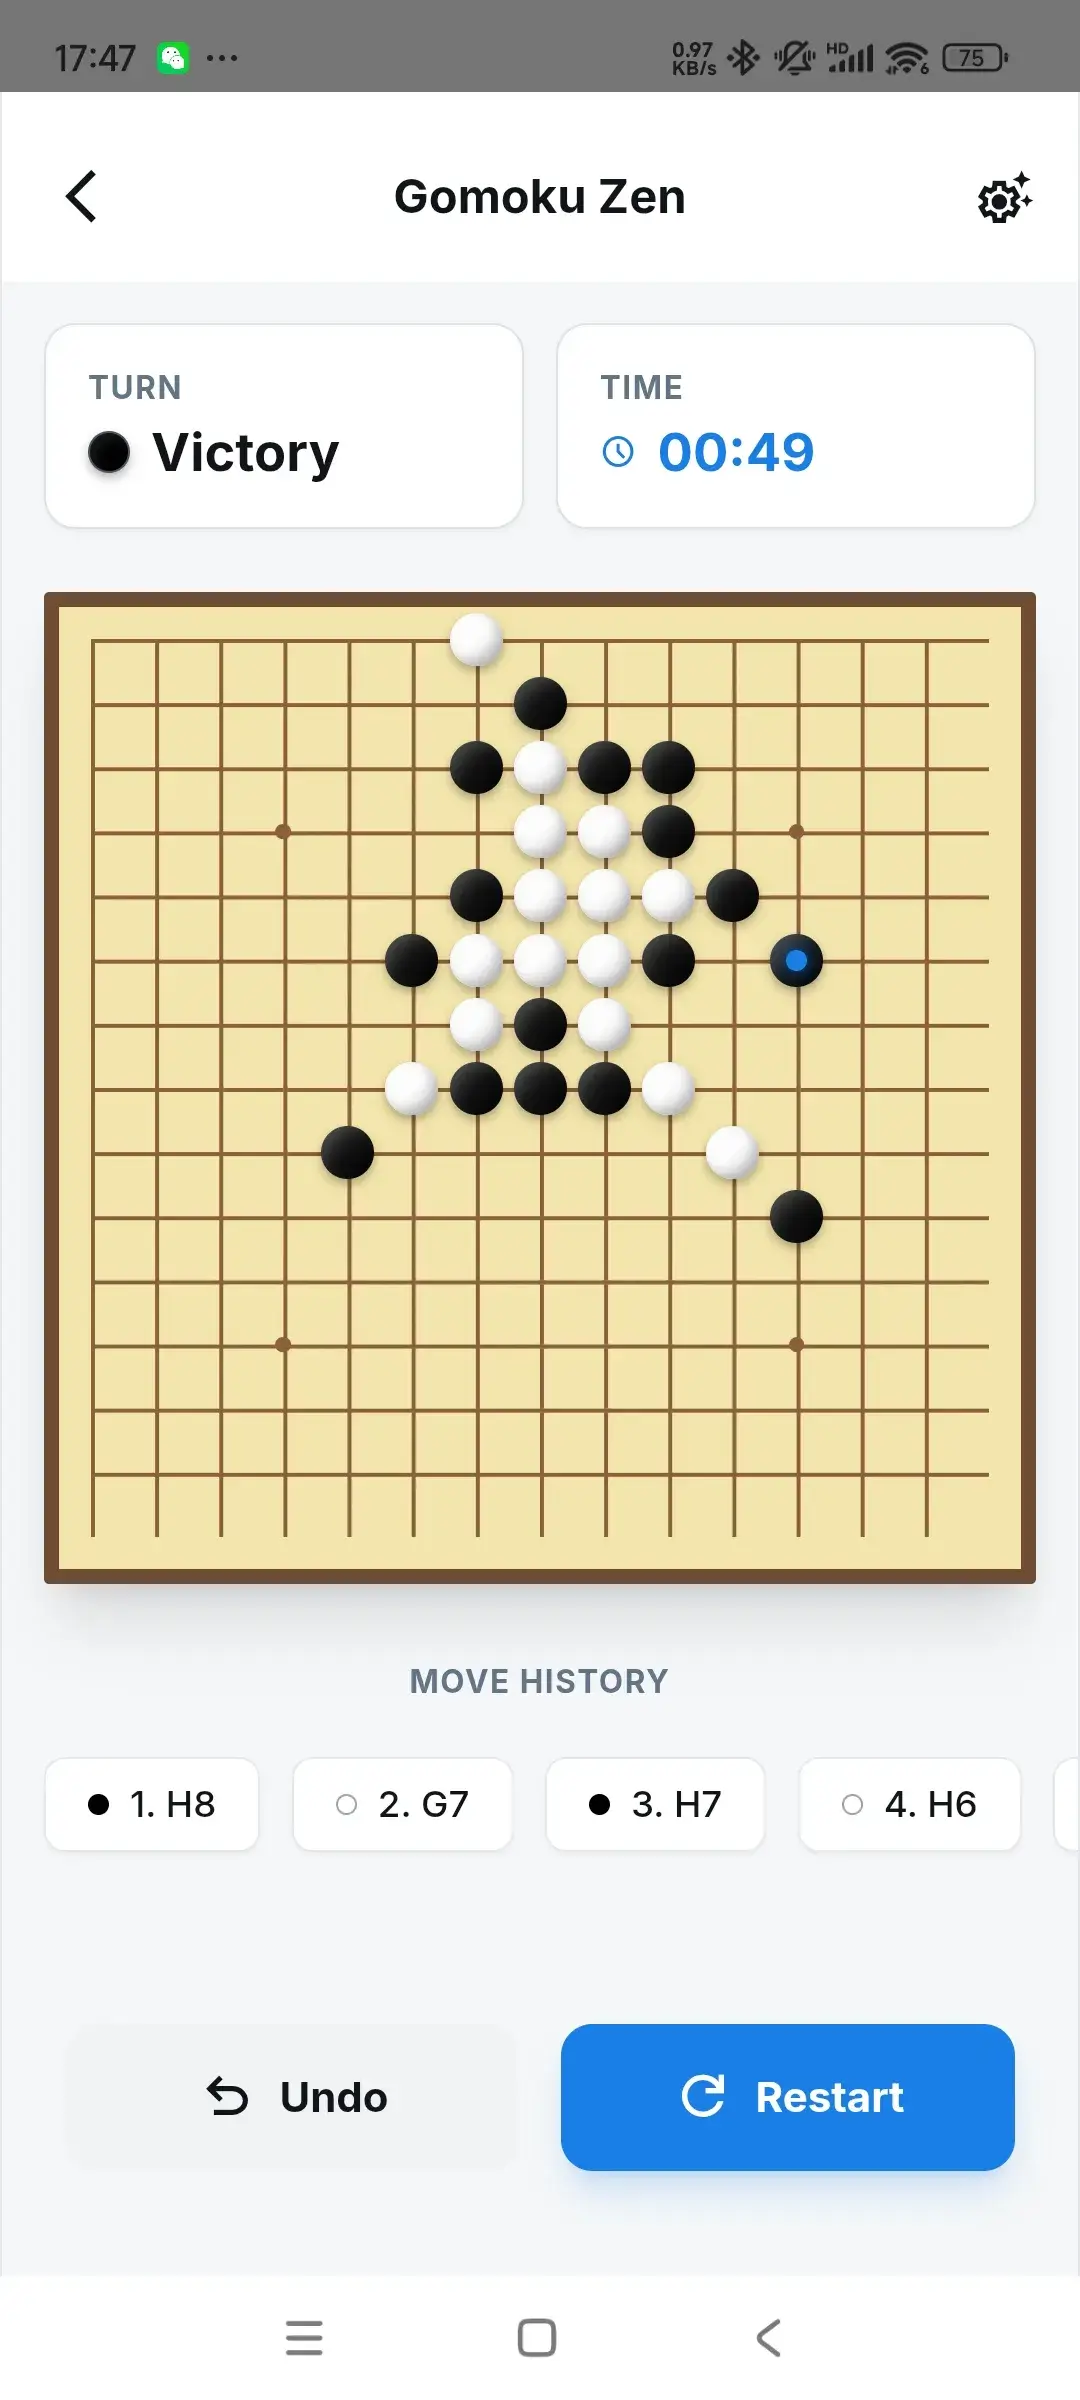
测试到成功与后端对接。
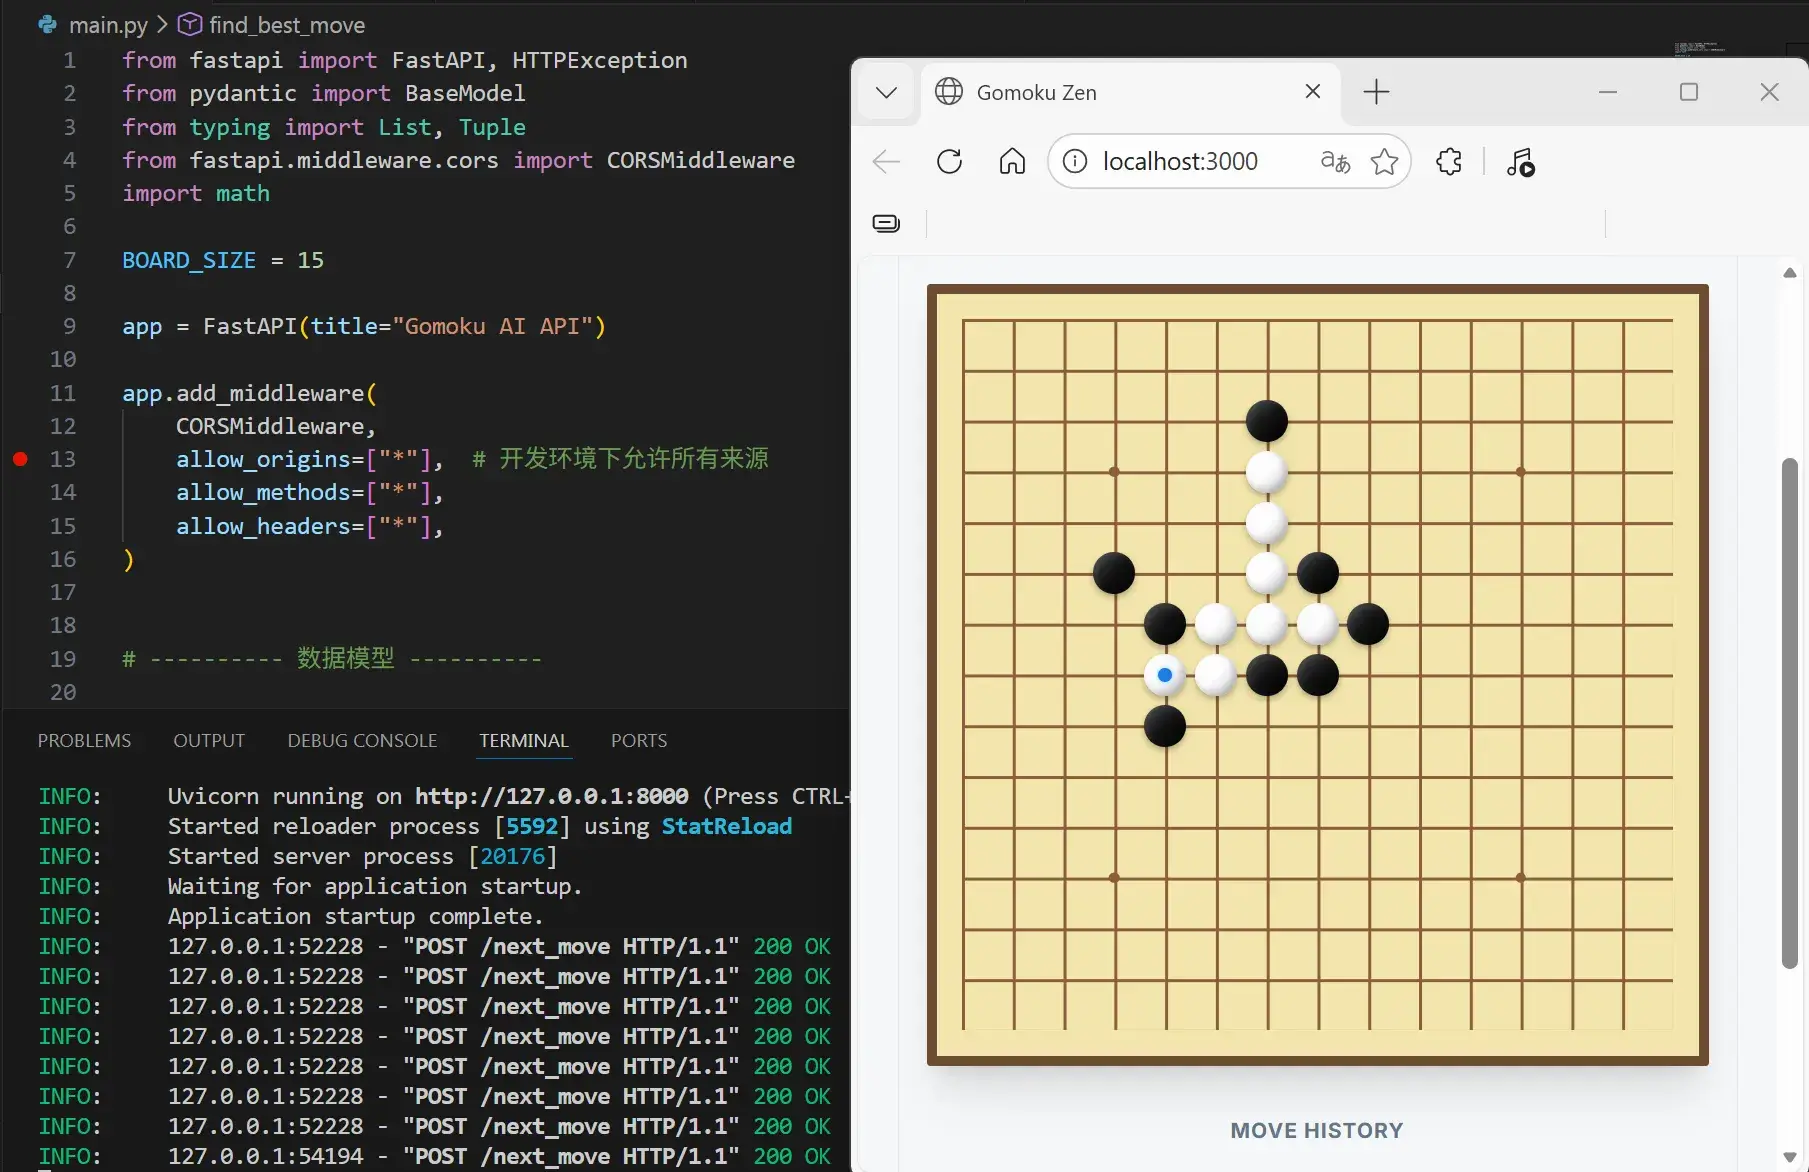
基于 Capacitor 的 Android APK 打包
安装 Capacitor:
npm install @capacitor/core @capacitor/cli找到 constants.ts,将服务器地址改成手机能连上的服务器地址:
export const API_BASE_URL = "http://192.168.0.100:8000";打包之:
npm run build> gomoku-zen@0.0.0 build
> vite build
vite v6.4.1 building for production...
/index.css doesn't exist at build time, it will remain unchanged to be resolved at runtime
✓ 34 modules transformed.
dist/index.html 2.79 kB │ gzip: 1.14 kB
dist/assets/index-CJVAeLpc.js 208.18 kB │ gzip: 64.80 kB
✓ built in 502ms
初始化 Capacitor:
npx cap init一路回车也可以。
[?] What is the name of your app?
    This should be a human-friendly app name, like what you'd see in the App Store.
√ Name ... gomoku-zen
[?] What should be the Package ID for your app?
    Package IDs (aka Bundle ID in iOS and Application ID in Android) are unique identifiers for apps. They must be in
    reverse domain name notation, generally representing a domain name that you or your company owns.
√ Package ID ... com.example.app
    √ Creating capacitor.config.ts in D:\XXX\front-head in 1.93ms
[success] capacitor.config.ts created!

Next steps:
https://capacitorjs.com/docs/getting-started#where-to-go-next
注意
- App name →
MyViteApp(随便起) - App package id →
com.example.myviteapp(必须唯一)
npm install @capacitor/android
npx cap add android
√ Adding native android project in android in 70.61ms
√ add in 71.38ms
√ Copying web assets from dist to android\app\src\main\assets\public in 11.26ms
√ Creating capacitor.config.json in android\app\src\main\assets in 497.50μs
√ copy android in 19.87ms
√ Updating Android plugins in 1.43ms
√ update android in 26.32ms
√ Syncing Gradle in 232.90μs
[success] android platform added!
Follow the Developer Workflow guide to get building:
https://capacitorjs.com/docs/basics/workflow
重要
每次改完前端:
npm run build
npx cap sync androidsync会把dist里的文件拷贝到android/app/src/main/assets/public/- 同步 Capacitor 插件
用 Android Studio 打开并运行:
npx cap open android[info] Opening Android project at: android.
Android 9+ 默认禁止 HTTP(明文)请求。项目中修改 android/app/src/main/AndroidManifest.xml,添加 android:usesCleartextTraffic="true"。让打包的 APK 能够允许 HTTP 明文流量:
<application
        android:allowBackup="true"
        android:icon="@mipmap/ic_launcher"
        android:label="@string/app_name"
        android:roundIcon="@mipmap/ic_launcher_round"
        android:supportsRtl="true"
        android:theme="@style/AppTheme"
        android:usesCleartextTraffic="true">
修改 android/app/java/com.example.app/MainActivity:
package com.example.app;

import android.webkit.WebView;
import android.webkit.WebSettings;
import com.getcapacitor.BridgeActivity;

public class MainActivity extends BridgeActivity {
    @Override
    public void onStart() {
        super.onStart();

        WebView webView = getBridge().getWebView();
        WebSettings webSettings = webView.getSettings();
        webSettings.setMixedContentMode(WebSettings.MIXED_CONTENT_ALWAYS_ALLOW);
    }
}
设置好 SDK 和 JDK,在 Android Studio 中打包一个 Debug 版本 APK:
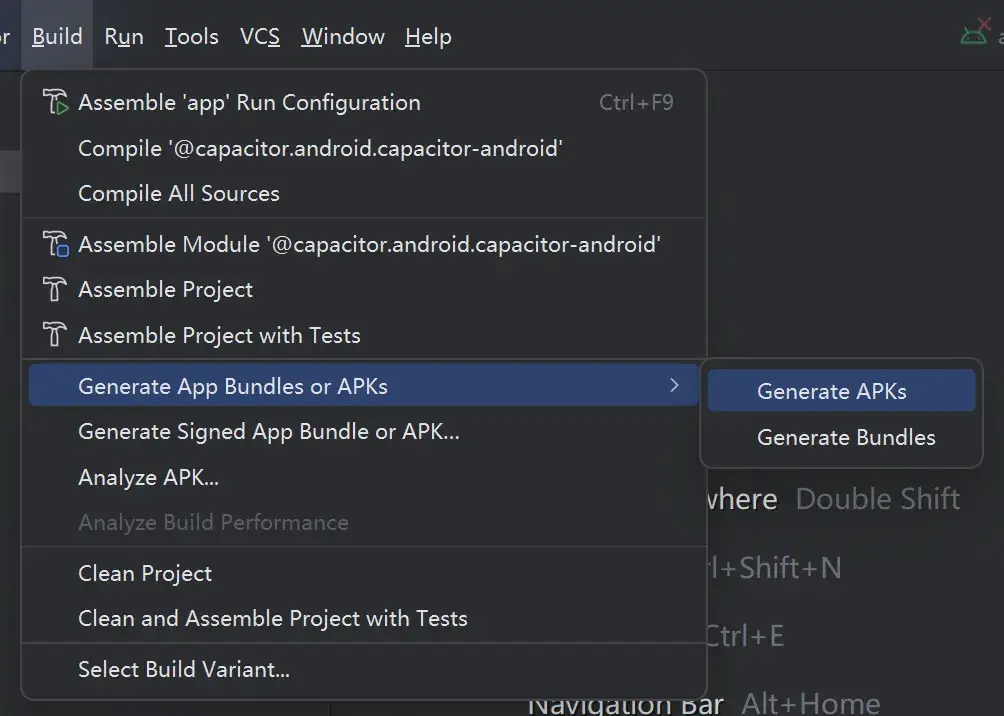
注意
在 Capacitor + Android 项目里,生成的 APK 默认会在 Android 项目的 build 输出目录,路径一般是:
<你的项目>/android/app/build/outputs/apk/
详细位置:
- Debug 版本 APK:
android/app/build/outputs/apk/debug/app-debug.apk
- Release 版本 APK(需要签名):
android/app/build/outputs/apk/release/app-release.apk
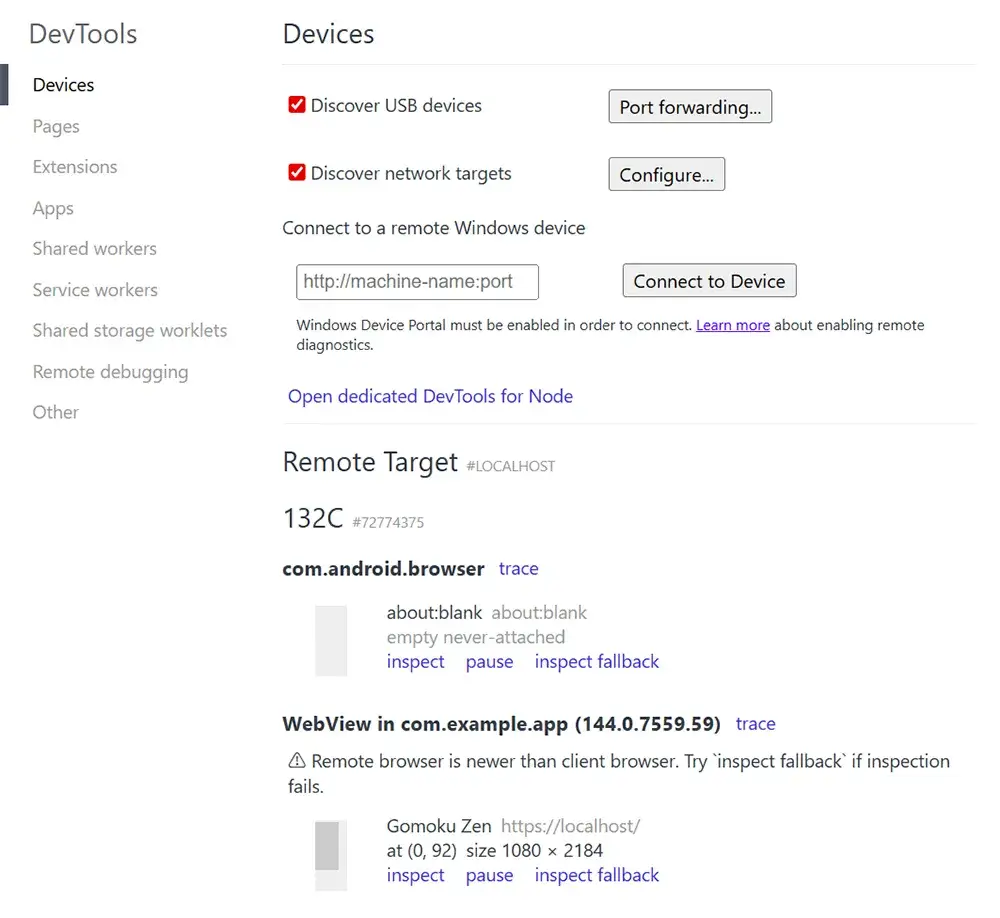
Android 调试
手机连接电脑,开启 USB 调试。在 Chrome/Edge 地址栏输入:
chrome://inspect/#devices
找到设备和 App,点击 Inspect: